


Instructional video on how to set up MFA
First time multi-factor authentication (MFA) setup.
- To set up MFA for the first time, we recommend using the Authenticator App if you don’t have access to SMS/Text on your phone. To use this option, select Authenticator App while setting up MFA.
- To Setup using Authenticator App click continue.
- To setup using SMS/Text click More options
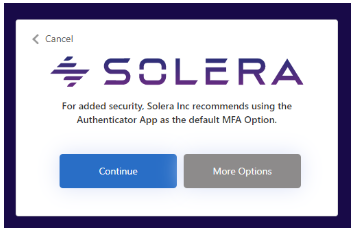

- If a user selects both the options, they will have to set up their SMS/ Text authentication first and then proceed with Authenticator APP set up.
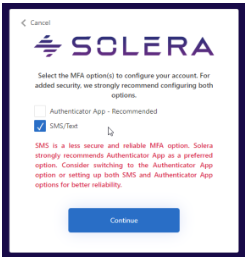
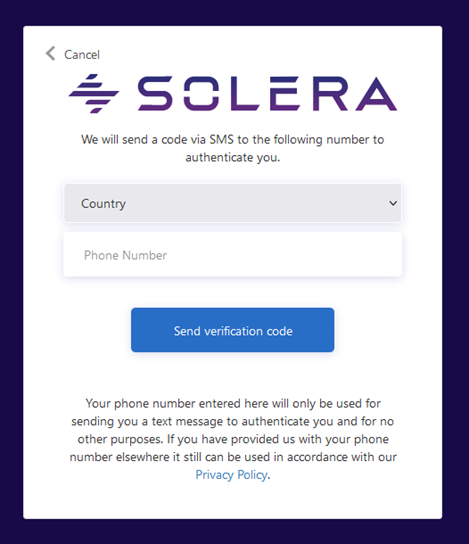
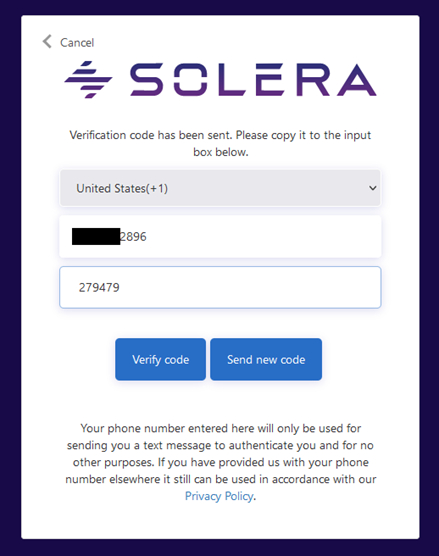
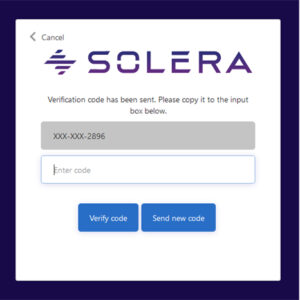
First time multi-factor authentication (MFA) setup using SMS/Text message on your phone.
- If you want to proceed with SMS/Text only select SMS/ Text and click continue.
- Select your country and enter your phone number with the area code then select the ‘Send verification code’ button.
- Use the verification code received on your phone to verify your phone number.
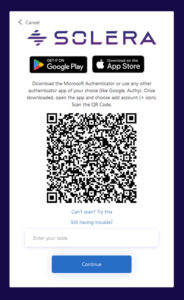
First time multi-factor authentication (MFA) setup using an authenticator application.
Steps to setup multi-factor authentication on your mobile device (Only)
If you only want to setup MFA on your phone, follow these steps.
- On your mobile device open any existing authenticator application.
- If you do not have an existing authenticator application on your phone, you can download Microsoft Authenticator, or any other application of your choice from your App store that supports TOTP (Temporary One Time Password).
- Click the add button (typically a “+” icon) in the Authenticator App to add a ContentsExpress account.
- Follow the instructions on the authenticator application screen to scan the QR code on the multi-factor setup screen using the Authenticator app, to authenticate your account.
Steps to setup multi-factor authentication on your Laptop/ Desktop device (Only)
- If you do not have access to a mobile device, or your organization does not allow using personal mobile devices, you can use a laptop/ desktop application to complete the multi-factor authentication.
- You can download any desktop application that supports TOTP (Temporary One Time Password) to authenticate your account from your desktop.
Returning user sign in options.
Returning user multi-factor authentication (MFA) using SMS/Text.
- If you are a returning user and you selected SMS/Text as a verification process, you will need to choose "Send verification code", then the SMS/Text will be sent to your phone.
- Once you receive the SMS/Text on your phone, enter the 6-digit code received on the ContentsExpress login page, then click ‘Verify Code’ to authenticate your account.
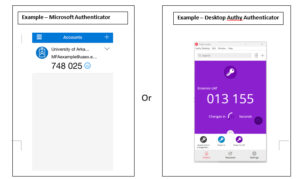
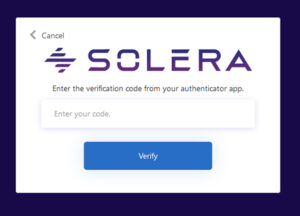
Returning user multi-factor authentication (MFA) using Authenticator App.
- If you are a returning user, and you selected an Authenticator App as a verification process, you must open your Authenticator App to get the verification code.
- If you used a Mobile Authenticator, then open the Authenticator App on your mobile device to get the 6-digit verification code.
- If you used a Desktop authenticator, like Authy, then open the desktop authenticator to get the 6-digit verification code.
- Enter the verification code on the ContentsExpress login page to complete the verification process.
What is multi-factor authentication (MFA)?
- Multi-factor authentication is a two-step verification method that adds an extra layer of protection in which a user is granted access to a website or application only after successfully presenting two or more pieces of evidence to an authentication mechanism: knowledge, possession, and inherence.
Why multi-factor authentication (MFA)?
- MFA protects user data—which may include personal identification or financial assets from being accessed by an unauthorized third party that may have been able to discover, for example, a single password.
Are you having issues? Contact Enservio Support.
If you are having issues setting up your MFA account or completing the verification process, please CONTACT US or Chat with Enservio Support at Live Chat (livehelpnow.net)